Thursday, August 11, 2011

Master Bath Progress Report

OK.  I know it has been a while since I have shown you my bathroom.....

Let's start over...It has been THREE MONTHS since I have shown you my master bath, but it is starting to come together. Yipee!...As a refresher, we started this project because we had a leak in our fiberglass shower insert which meant the whole thing needed to be taken out.  The entire bathroom was exactly the same as the day the builder put it in (plus the wear and tear of 15 years)...white walls, off-white linoleum with little blue flowers, gross shower, cheap baseboard.  It was great.  No, it wasn't.  So with the DIY spirit in full effect we went for it....well, my husband went for it.  As a reminder here is what we started with and what we ended with....


Hooray for husbands and power tools!.....Yes?... No? (You can read part one of this saga here.)  My husband had been out of work for a few weeks (he works construction) and was able to make progress on getting the space back into working order....then he went back to work, and the bathroom sat and sat and sat.  Not only are we limited on our budget, but sometimes we are procrastinators too.  So our Pastor decided to come in and give us a hand.  Our "Pastor" you said??  Yep, not only is he a man of God, but this guy can do EVERYTHING....seriously!  So here are some after pictures just to prove to you that this little train is chugging along.


We went with the Castle Travertine from The Home Depot.  The tiles on the floor are 18x18 and in the shower we just cut them in half to make into subway tiles.  The main floor in the picture is pre-grout and there is still a lot of work to be done (painting all the casings and adding baseboard), but it is at least starting to look like a bathroom again.  Thankfully we had lived in an apartment for several years and are use to only having one bathroom.  Ok, so that's not really a good excuse, this project has taken way too long.  Period. I can see the finish line though, and the results will all be well worth it.  Have you ever taken on a huge remodel without knowing how it is all going to work itself out?  What project of your has taken the longest on your DIY list?  Make sure you subscribe to my blog so you will be able to see the big reveal.

Tuesday, August 9, 2011

July 2011 Treasure Box

This summer has been a DIY bummer for me.  Spending time with my kids is always top priority, but I knew thought that I would still be getting projects done and blogging in between.....SO NOT WHAT HAPPENED.

I have however managed to score some pretty good stuff.  But since I already told you that I'm not doing much of any DIY right now, it has started to pile in the "gonna-get-to-it-real-soon" pile.  Don't act like you don't have one of those piles too!  Although, mine isn't a true pile, I stick stuff here and there hoping that my husband doesn't notice that the stuff truly is piling....but I will get to it, I promise! 

So in order to keep my pile organized and make sure nothing gets overlooked in the shuffle, I have decided to do a monthly Treasure Box update.  I am hoping that it will keep me motivated to make the "gonna-get-to-it" pile an "already finished" pile!  So here is what I managed to smuggle in this month:

 This fixture is going to hand above my doorway in the little entry way as you walk in the front door....I already tried to hang it once but....well, I will just say I'm going to try again on another day.  Since the tag is a little hard to make out the original price was $78 and I scored it for $4.88...that's a major score in my book!  (I bought it from Lowes.)
 These are twiggy branchy thingy's....I knew I wanted whitish ones, and these fit the mold.  They will eventually live in a vase next to the china hutch...you know, after I paint the walls.  These were $16.99 from Marshall's
 This more than likely will get a fresh coat of paint and live in the garden.  It was only $2.00 from a local church yard sale.
 I got this from the same yard sale, it was fiddy cents...it will most def get a coat of paint and have a candle of top...why did I even buy this thing?...I really don't want to accumulate clutter without a home...
 This fixture I bought from The Home Depot.  It was originally $50-ish and I got it for like $25???  Can't totally remember but it was something like that.  It is going to go up in the bathroom that we are currently redoing. (You can see the progress of the bathroom HERE or HERE.) 
 I got this from a local thrift store for $5.00.  I love it....minus the flowers...I thought a nice grey and white chevron pattern would be nice on top.
 This is....uummmm....it's a brass thing.  Planter??..I don't know why I bought this either.  It was only $1.00, but it will probably be tossed in to my husband's pile of brass that he is collecting to recycle...think he will notice it?
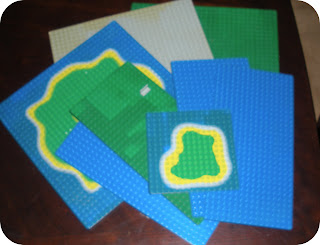
 Oh yeah, and these....ok, so they are not destined for any DIY project.....but they make my little tender-roni boy smile.  They are lego mats....I got 10 for $3.00...that is a score.  Oh, and speaking about my little lover-bugger-boy he had his very first dentist appointment in July.
 And since we are on the subject of family......HERE IS OUR NEWEST ADDITION.....


Her name is Coco Puff the Puffer Pants....yes, that is really her name.....we adopted her from the SPCA and we love her!  I don't know how we have gone for so long without a pet.  That is all for the month...lots of stuff that needs stuff done to it.  What have you bought lately?  Are you struggling getting things done while the kids are home?  OR EVEN BETTER YET....do you have any ideas of what to do with the junk I bought?

P.S. I also have been acquiring a lot of new frames for my gallery wall. What gallery wall?...You know, the one that I am going to get to.  I will show you the frames in one post when I get ready to undertake that project...oh the suspense. (Ok not really, but lets just pretend like it's suspenseful....?)